Entries in iphone (67)

Tuesday
Oct062009

Create It in Your Hand, Share It with the World

Below is some of my 30 minute talk at Handheld Learning 2009 in London.
The presentation is called
Create It in Your Hand, Share It with the World.

Create it in Your Hand Title

I decided to become a teacher when I was in sixth grade. From then on I studied each and every teacher I had and analyzed each and every activity they had me do. As a student I vowed to remember what I liked and didn’t like like when I was finally the one in charge.

I was lucky enough to have Palm computers for my fifth grade students in 2001. I would have very much liked a handheld computer when I was 12 years old. Though, I’m afraid that even if they were available in the 80s, most of my teachers wouldn’t have used them in very engaging ways.

Palm Apps SlideAs a teacher, I tried hard to use the handhelds in my classroom as creatively as possible. Of course I wanted to make learning fun. Boredom is the enemy of learning. We had about 50 apps we used on the Palms. Most all of the apps were drill and skill apps. Which, don’t get me wrong, were great. My handheld-equipped students learned their multiplication tables, historical figures, and science vocabulary faster than they would have with ordinary tools. Even with thousands of Palm apps, it was sometimes hard to find or adapt apps to move beyond drill and practice.

My favorite handheld today is the iPod touch. It’s amazing to compare the number of iPod touch and iPhone apps to the number of apps for the Palm Operating System. Ten years after the launch of the Palm OS, we have 30,000 apps for Palm devices. After little over a year since the launch of the App Store for iPhone and iPod touch, we have 85,000 apps, with and average of 46 new ones being added each day. There’s just got to be some good ones for students, right?

Name Tag Web App
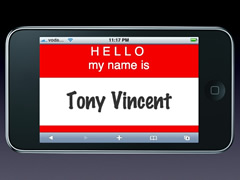
Of course, many of them are silly or frivolous. In fact, this name tag on the screen is actually a web app for iPod touch. Just point your mobile browser to mkaz.com/nametag and input your name. Presto! You are now holding a very expensive name tag.

But peeking into the App Store, there are plenty of apps for learning. Multiple-choice quizzes, flash cards, math games, and the like are plentiful.

Benjamin Bloom ranked thinking skills from lower order to higher order in 1956. Bloom’s Taxonomy helps teachers classify the objectives we set for students. Like we just saw, there, are plenty of titles in the App Store that address lower order thinking skills, like remembering, understanding, and applying.

Anderson and Krathwohl have slightly reworked Bloom’s Taxonomy for the 21st Century. What’s the highest order thinking skill? Creating.

New Bloom's SlideCreation VerbsThree Products Slide

Creating is reorganizing elements to form a new functional whole. In order to create, you have to evaluate. But in order to evaluate, you must be able to analyze. In order to analyze, you have to understand. And to understand something, you must be able to remember things about it. So, creating is the ultimate activity.

As a student and as an adult, I love to create things. In sixth grade I produced a video about the U.S.‘s Strategic Defense Initiative. It wasn’t exactly assigned by the teacher, but I didn’t care. I wanted to learn how to make a movie and share it with my classmates. As you can see, there are lots of verbs associated with Creating. I enjoyed planning, producing, and broadcasting that video.

American writer John Updike wrote, “Any activity becomes creative when the doer cares about doing it right, or doing it better.” We can kind-of-sort-of make our students care by holding grades over their heads. But that’s not authentic. Educators can invent activities (or have students invent activities) that are creative and that they will be excited to share with an audience.

I’d like to share with you three kinds of products that can be created on an iPod touch or iPhone: Comics, Animations, and Audio Podcasts.

Comic Touch ExampleComics are a great way to synthesize information. The combination of images and text can be fun to plan and fun to read. Comics may sound like fluff, but consider that last year Google commissioned a comic book to tell the world about why they are making the Chrome web browser and the technologies inside of it.

Comic Touch and Comic Touch Lite are two of a few iPod touch apps where you can create comics. You can import any saved image into Comic Touch and layer text bubbles on top of it. There are also some limited special effects you can apply to the image. Where can you get images?

You can save images from the web. Mobile Safari makes it easy. Simply tap and hold an image and the Save Image option will appear. The image will be saved into your Saved Photo album, which is accessible in Comic Touch.

I want to share my comics on my website. I have to think about copyright--I should have permission to use copyrighted images. So I use Creative Commons licensed images. You can search for images that are labeled for reuse using Google Image Search. However, you have to choose to do an Advanced Search from the Classic view first. Then you can select to only search for images that are copyright friendly. I suggest bookmarking the Advanced Image Search page or saving it as an icon to your Home screen.

Screenshot SlideYou can also save screenshots of what’s on your iPod’s screen. Hold down the Sleep/Wake button on top of the device and quickly press the Home button. The screen will flash and you’ll hear a camera sound. The screenshot is now in your Saved Photos album.

I think it’s fun to take screenshots inside of Google Maps. Sure, you can take screenshots of the satellite view, but it’s much more fun to go into Street View and take screenshots. Whenever I have a pin on the screen, I can tap the orange and white Street View icon to go into street view. Here’s I’m in Washington D.C. taking photos of the Supreme Court Building.

I can use these images from my virtual field trip in a comic. Another comic-creation app is Strip Designer. Strip Designer lets me have up to three panels in my comic.

Let me show you a comic I made using images from Street View and images I’ve saved in Safari. My goal is to tell about the three branches of the U.S. government and their role in a particular issue. I chose mandated health insurance as the issue. I ended up with three two-panel comics. I was able to save them in high resolution and email them to myself. If I was a student, I could email them to the teacher. The teacher could then put them up on a class website. Or, many blogging and photo services allow for posting directly from email. The comic I just made in my hand is just an email away from being published for the world to see! (Watch a video that explains how I made the comic.)

US Government Comic

Jigsaw SlideFor even more fun, I could save my comic to photo or save a classmates comic to then use an app like Ali’s Jigsaw Puzzle to turn the comic in a jigsaw I can put back together by dragging the pieces around my screen.

So comics are a fantastic way for students to piece together their learning and share it with others. Now on to animations.

A favorite Palm app of my students’ was Sketchy. We could draw directly on the screen, duplicate the frame, make a change, and then duplicate the frame again until a masterpiece was created. When played in a row, you’ve got yourself an animation.

Planning and drawing a animation can take time, but it’s time well spent. The learner is interacting with content in a creative way and he or she enjoys sharing the final creation with others. Heck, they’ll watch their own creation over and over again.

Flipbook and Flipbook Lite are two of a handful of animation apps for iPod touch. It’s tricky to draw without a stylus and there’s no text tool. But there are useful features like layers and onion skinning. Then, when done, users can publish the animation to Flipbook.tv, where the file can be viewed by others and saved as mp4 video files. View samples.

Like comics, animations are great way for students to sythesize their learning and present it to others.

Record SlideThe third kind of product people can create on iPod touch are audio podcasts. There are a variety of apps for recording audio. The catch is that iPod touch lacks a built-in microphone. There are mics that attach to the connector on the bottom of the device. Or, you can buy earbuds with a build-in mic like the iPhone has.

When making audio recordings, I usually like to record directly into my laptop so I can edit and arrange the audio as I record. But, in classrooms where there aren’t enough computers or students need to record in the field, iPod touch can be made into a little podcast studio.

Let me play a short clip from a field trip I took recently. (Download the clip.) In Tucson, Arizona there is the Sonoran Desert Museum. Yes, there’s a museum in the desert about the desert. It was a really hot summer day. I took a break under a tree and felt a light, cool mist. I thought maybe the museum rigged up something for their guests to keep cool. I asked a couple docents under the tree where the mist was coming from...

I used an iPod to make a sound-seeing tour of my trip. I was forced to describe what I saw during my excursion.

Trimming Option Slide
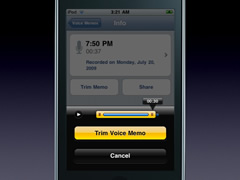
The Voice Memos app is a pretty straight-forward app for voice recording. Besides a trimming option, it has a handy feature of being able to email recordings as an attachment. That’s great because the blogging service Posterous lets you post podcasts by email! Simple email the recording from Voice Memos to your Posterous email. It’s automatically posted to the blog and has a news feed so it can be subscribed to in iTunes.

Now, schools probably want to screen audio recordings before they are posted. Instead of emailing Posterous, students email to their teacher who could then post it after approving the content. It’s exciting that something recorded during a field trip can be instantly published online.

Comics, Animations, and Podcasts are just three of many creative endeavors that can be done on an iPod touch or iPhone. In fact, you don’t need an Apple product to create--other phones and handhelds have similar apps. But the key is letting students create. Letting them create something they care about because they are sharing with, educating, or helping others. Another key to success is letting students choose what kind of product they are going to create--give them a choice of making a series of comics, an animation, or podcast.

12 Year Old Tony VincentTwelve-year-old and thirty-four-year-old Tony Vincent both enjoy having choice. Giving choice engages learners because everyone likes to have a say in what they do. After using these apps for a while, students will get a sense of what they like to create--let them choose!

I worked with a school in Phoenix last month and I received an email from one of the high school’s English teachers. After showing how to create comics with students, Jason wrote, “It all of a sudden has become important to my students to get the information right, which isn’t always the case when they do a ‘worksheet.’”

If you’re interested in iPods, I have created a podcast called Learning in Hand: iPods. Like Jason’s students, it is important for me to get the information right in my podcast because I know that thousands of teachers download what I've created and shared. I learn so much in the process.

Tuesday
Sep222009

iPods Episode #19: Maps, Screenshots, & Comics

Learning in Hand: iPodsLearning in Hand: iPods Episode #19: Maps, Screenshots, & Comics is ready for viewing. In the video I show you how to take a tour of Washington, D.C., take photos along the way, and use those photos in a comic strip--all on an iPod touch. I use the Maps app, the screenshot feature, Google Earth, and a comic-creation app.

Watch all 11 minutes 37 seconds of Episode #19 to see the comic strip project come together. The transcript and sample comic strips are included below.

Subscribe in iTunes

RSS Feed


Transcript:

Episode #19: Maps, Screenshots, & Comics This is Learning in Hand: iPods. My name is Tony Vincent and this is the show where I share tips, how-tos, and ideas for iPods in teaching and learning. Episode 19, “Maps, Screenshots, & Comics” recorded September 2009, happens now!

Let’s take a tour of Washington, D.C., take photos along the way, and use those photos in a comic strip--all on an iPod touch. We’ll use the Maps app, the screenshot feature, Google Earth, and a comic-creation app.

My task for this comic is to create a comic strip to be published online that summarizes how a chosen issue is dealt with in each of the U.S.’s three branches of government.

Comic Thumbnails

Photos Creative Commons licensed: Supreme Court Justices by Steve Petteway,
President Obama by Steve Jurvetson, and Senate Chamber by Susan Sterner.

The Maps app is loaded on every iPod touch and iPhone. Maps requires a Wi-Fi connection because it uses the Internet to get its Google Maps data. I can simply search for Supreme Court Building Washington, D.C. and Maps zooms to the location. If your map isn’t showing satellite imagery like mine, tap the corner to select Satellite. You might also like Hybrid view to see street and landmark names layered on top of the Satellite images.

Slide to pan. Spread or double-tap to zoom in. Pinch to zoom out.

Google has driven around specially outfitted cars to take panoramic photos. These panoramas can be seen in Street view in Google Earth and Google Maps on desktop computers. But, guess what? Street view is available on iPod touch and iPhone as well! You’ll see a white and orange icon next to a description if Street view is available.

Supreme CourtWhere this red pin is dropped for the Supreme Court Building does not have the icon, so Street view isn’t available here. That’s probably because the pin is not on a street. I can add my own pin by tapping the icon in the bottom-right corner and tapping Drop Pin. A purple pin appears on the map. I can drag and drop that pin to any location. Let’s try to drag it in front of the Supreme Court Building. Notice that now the orange and white Street view icon appear. Tap it to switch to Street view.

Tap and drag to view the panorama. Stretch to zoom in and pinch to zoom out. Tap the arrows in the street to view a panorama taken 10 to 20 meters away.

This looks like a great photo op. I can take a photo of anything on the screen by hold down the Sleep button and quickly pressing the Home button. The screen flashed and you hear a camera noise.

“Where is the Photo stored?” you might be wondering. It’s saved into the Photos apps in the Saved Photos album. That makes sense. Let me show you. I tap Photos and then the Saved Photos album. Then I can tap to find the screenshot. It’s saved as an image file. I can email it, sync it to copy it to a desktop computer, or import it into other apps. I’ll show you how to import it into a comic app shortly.

For now, I’m going back to Google Maps. Remember, I want to construct a comic strip that summarizes how a chosen issue is dealt with in each of the U.S.’s three branches of government. For my comic, I’ll also need photos of the Capitol Building and White House.

So, I just type in a search. There it is, the United States capitol building. The pin closest to the building does not have the Street view icon. So, I tap to place a pin in the street directly in front of the Capitol. Like I did with the Supreme Court Building, I can hold down the Sleep/Wake button and press the Home button to take a snapshot of what’s on the screen. I’ll use that snapshot in my comic strip.

Google EarthNext, on to the White House. Unfortunately, I could not find very good photos of the White House in Street View. I could take photo of the Satellite view of the White House. Instead, I’m going to launch the free Google Earth app and take a screenshot there. Google Earth doesn’t come preloaded on iPod touches like Maps, so you’ll have to download it from the App Store.

Google Earth has a snazzy zooming feature, ability to tilt, and information layers you can view. And like in any other app on iPod touch, I can hold down Sleep and press Home to take screenshot any time. I tap the Search button and away we go.

This looks just like Satellite view from Map. But, when I tilt the iPod, I get the tilted view, which will make for a better snapshot. I can zoom, rotate, and move around in Google Earth until I find just the right view. But, I don’t want those red pins in the photo. To remove them, I need to clear my search. Just tap the Search button and tap the X and then Cancel. The pins are removed! Now I can take a screenshot. In fact, I’ll take several so I can pick the best one when it comes time to import them into my comic strip.

For my comic strip, I also want photos of not only the buildings, but the people who head the three branches of government. So, I use Safari to search for images. I’ll be able to save the images to the Saved Photos album.

I’m going to do an a Google Image search by going to images.google.com. The website knows that I am visiting from an iPod touch, so it formats the screen for my device. Unfortunately, that format removed the Advanced options. I want to use Advanced image search options so I can search for copyright-friendly images. That way I can publish my comic strip online.

To get to Advanced options, tap the link to View Google in Classic. This is the same google Image Search page you’d see on your desktop computer. If I double-tap to zoom in, I can read and tap the link for Advanced Search. I input to find the word Obama and then scroll down to Usage Rights and select “labeled for reuse with modification.” Now I tap the Google Search button to see the results.

I tap a thumbnail image to see a larger one. I like this photo and want to save it. First, I note the author and URL so I can give attribution to its owner. Then I tap and hold the image. I am given a list of options. I choose to Save Image. That saves the image in my Saved Photos album in the Photos app.

I use Advanced Search and save photos for the other branches for the comic strip. I suggest bookmarking Google’s Advanced Image Search page for future use.

For $2.99 I bought Strip Designer in the App Store. I use Strip Designer to combine the snapshots I took in Maps and Google Earth and saved photos from Safari to make a series of comic strips about the three branches of government’s role in an issue. Let me show you how...

Launch Strip Designer and tap to Create new strip. Select a category and a template.

Strip DesignerTap a frame to add a photo. Choose to select a photo from your Photo album and select Saved Photos. Tap the first image you want to use in your comic. I choose the White House screenshot. I can rotate, resize, and position the image and tap Done. Tapping the Add button allow me to add speech bubbles. There are several types to choose from. Double tap the new bubble to input text. Tap the corners to change the size of the bubble. Then tap and drag to position the bubble where you want it.

You can also change the text, background, and line colors.

Now I can tap the next frame to add another photo from my Saved Photos photo album. Again, I can position the image exactly how I want it in the frame and tap Done. Then I add a speech bubble.

When the comic is complete, you can save. You can save high or low resolutions. I like high res so that the comic looks as crisp and clear as possible. You’ll probably want to save For later editing. That way you can go back and make changes. Just give it a description and the comic is saved under Saved strips from the main menu.

But you’ll also want to get the final image off the iPod. You can tap Save again and this time choose to send by email if you have an email account set up with the iPod. Alternatively, you can choose to save the image to the Save Photos album where the photos can be access on a desktop computer during a sync. It will be a JPEG image once it’s emailed or synced. Of course, with a JPEG it can be printed, posted on blog, or imported into a slide show.

As you’ve just witnessed, the Maps, Google Earth, Safari, and Strip Designer apps are are very useful individually. When used in combination, you can see that students can create compelling products, all right in their hands.

That’s it for Episode 19. For more about iPods and podcasting, click on over to learninginhand.com. That’s where you can contact me to book an online or in person workshop for your school or organization. Thanks for watching!

Thursday
Sep102009

Finding App Recommendations

With over 75,000 titles in the App Store, some help in discovering apps is welcome. iPhone and iPod touch users can get app recommendations based on apps they have downloaded with the newly released iPhone OS 3.1.

Here's how to turn on Genius App Recommendations:

  1. Launch the App Store app on your iPhone or iPod touch.
    App Store Icon
  2. Tap the Featured button at the bottom of the screen.
    Featured Button
  3. Tap the Genius button at the top of the screen.
    Genius Button
  4. If this is the first time Genius Recommendations for Apps has been accessed on the device, you will be prompted to turn on Genius. The screen tells you, "Turning on Genius Recommendations for Apps will send information about the apps you download to Apple." Click Turn on Genius.
    Turn On Genius
  5. Input your iTunes account password and tap OK.
    iTunes Password
  6. Read the Genius for Apps Terms of Service. Scroll to the bottom of the page and tap Agree. Then tap Agree in the dialog box at the bottom.
    Terms of Service
  7. "You've successfully turned on Genius for Apps." Tap Done.
    Success
  8. Scroll through the recommendations. Tap a recommendation to view the details page for the app where you can buy/download.
    Recommendations
  9. To remove a recommendation from the list, swipe it to reveal a Remove button.
    Remove Item

Here are some sample recommendations from my iPod touch:

Genius for Apps leaves a lot to be desired. Perhaps with time the recommendations will improve as Genius learns more about my app use. I would like to be able to select an app to see recommendations rather than scrolling through random items. Additionally, I'd like to see Genius for Apps added to iTunes so I can browse recommendations on my desktop computer instead of on the handheld.

Of course, the best app recommendations for teaching and learning come from other iPod touch and iPhone-using educators. Here are some websites with lists of apps:

iPhone/iPod touch Apps for K-12iPod/iPhone Apps for EducationUsing the iPod touch in the ClassroomIEAR

Wednesday
Sep092009

Easier Way to Arrange App Icons

iTunes 9 has been released and has a new feature: the ability to rearrange iPod touch and iPhone Home screen icons from inside of iTunes on a desktop computer. For me, having over 160 apps and 11 Home screen pages has been a pain to organize. It's amazing how much easier this is to do in iTunes rather than on the handheld. Here's how:

  1. Download and install iTunes 9.
    Download iTunes Now
  2. Connect iPod touch or iPhone.
  3. Click the device's name under Devices.
    Devices
  4. Click Check for Update under the Summary tab. The iPod touch or iPhone must be updated to version 3.1 or later. (iPod touch users with versions earlier than 3.0 will have to pay $4.95 for the upgrade. Version 3.1 is not available for 1st generation iPod touch.)
  5. Click the Applications tab.
    iTunes Tabs
  6. Click and drag to arrange the icons on the page. Drag and drop an icon to move it to a different screen. Click and drag the screens to change the order.
    Arrange Icons in iTunes

I would still like to see automatic organization by category or alphabetically. Manually arranging icons, whether on the device or desktop, is time consuming, especially for classroom sets of iPod touches. As far as I can tell, you arrange the Home screens for each device individually.

Tuesday
Sep082009

iPods Episode #18: iPod touch Basics

Learning in Hand: iPodsLearning in Hand: iPods Episode #18: iPod touch Basics is available. In this video podcast I show the basics that iPod touch and iPhones users should know. Items in this episode:

  • iPod touch runs the iPhone Operating System that is currently at version 3.0
  • Sleep/Wake buttons
  • Slide to unlock
  • Touchscreen information
  • Home screen organization
  • Selection of text
  • Copy & paste
  • Setting up Wi-Fi internet access
  • Turning off keyboard clicks
  • Apple's 100+ page iPod touch manual
  • Go to a web app user guide in iPod touch's Safari at help.apple.com/ipodtouch

Watch all 5 minutes and 27 seconds of Episode #18 to have the basics covered. The transcript is included below.

Click to Play

Subscribe in iTunes

RSS Feed

Transcript:

This is Learning in Hand: iPods. My name is Tony Vincent and this is the show where I share tips, how-tos, and ideas for iPods in teaching and learning. Episode 18, “iPod touch Basics” recorded September 2009, happens now!

No Stylus
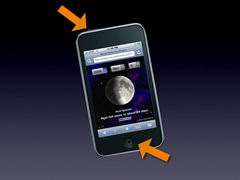
Tens of millions of iPod touches and iPhones have been sold. They are so popular because they are great media players, fairly powerful computers, and have a large library of great software applications in the App Store. Also, these handhelds are easy to learn and use. After all, aside from the volume controls, there are only two physical buttons. For most all functions, users simply touch their fingers to the screen. Even though the iPod touch is mostly intuitive to learn, I’d like to take the time to show some of the basics for those who want a jump start.

iPod touches run the iPhone Operating System. That’s right, an iPod touch is so similar to an iPhone that they run the same operating system software. Currently the newest version of iPhone OS is 3.0. iPhone OS 3.0 has some very useful new features like selection of text, cut/copy/paste, and search.

Before we take a peek at those features and other basics, I’d like to talk a moment about those two buttons. The Sleep/Wake button is located on the top of the device. It’s the button you hold down for 5 seconds to turn the iPod on. Or, if the iPod is not powered down, it’s the button to press to wake it from Sleep. You’ll be asked to Slide to Unlock. This way your iPod doesn’t accidentally wake up in your purse or pocket. Then, there’s the Home button. It’s the button with the square on it, just below the screen. Use this button to get back to your listing of Apps no matter what screen or app you’re in.

The touchscreen is designed to work with your fingers. Instead of using a resistive touchscreen that requires a stylus, iPod touch uses a capacitive touchscreen that senses the presence of your finger. That means you don’t have to apply any pressure to the screen--even a very light touch does the trick. If you really want to use a stylus on the screen, you’ll need one specially designed to work with capacitive touchscreens.

Besides tapping, there are others verbs associated with multi-touch, including slide, swipe, pinch, spread, flick, double-tap, two-finger tap, and two-finger slide.

Search Screen GrabIn iPhone OS 3.0, you can swipe to the left of the first Home screen to get a search box. This searches your apps, contacts, and notes. I actually have over 100 apps on my iPod, so I search to launch apps instead of swiping through 8 page of app icons.

I like to have the apps I use most in the dock. That way I can get to them with one tap after pressing the Home button. I like other apps I use often to be on the first page. That’s because when I’m on, say, my fifth page of apps, I can just press that Home button to be taken instantly to the first page of apps. To place your apps in the dock and to place them on the pages you want, just tap and hold one icon. Within seconds they will all jiggle. Now I can drag them wherever I want them. Once you have everything the way you want it, then press the Home button to get that wiggling to stop.

Another useful feature of iPhone OS 3.0 is selection of text. I just tap and hold the screen. Then I move the blue dots to fine-tune my selection. I can tap copy to copy the text for pasting someone else later. To paste, I just tap where I want the pasting to begin and then tap and hold the screen for a moment. Then I tap the Paste button that appears.

Most likely you’ll want to connect iPod touch to a Wi-Fi network. Do that in the Settings App. If the Wi-Fi access point requires a password, you’ll be asked for it. However, next time you are in proximity to this network, iPod touch remembers the settings.

Turn off clicksWhile you’re in the Settings app, you might want to turn off Keyboard Clicks in the General section under Sounds. If iPod touch is being using in a classroom, those clicks can be very disruptive and annoying (unless earbuds are being used) because each keystroke makes an audible noise.

If the little pamphlet that came with your iPod doesn’t satisfy your need for information, Apple has a 121-page manual in PDF form online for your reading pleasure. You might find the information about the ins and outs of syncing with iTunes particularly helpful.

Also, Apple has a web app called iPod touch User Guide. A web app is a website that’s specially formulated for an iPod touch’s screen. So, you can go to the address on your screen in the Safari app on your iPod to read the guide.

There you have it. Some of the basics of using iPod touch. And that’s it for Episode 18. Thank you very much for watching!

Sunday
Aug232009

Monoprice.com for Inexpensive iPhone & iPod Accessories

Monoprice.comiPod and iPhone accessories can be costly. Apple charges $19 for a syncing cable, $29 for a wall plug, $29 for earbuds with a microphone, and around $25 for a protective case.

I'd like to tell you about a website where you can find equivalent products that are a fraction of the price. It's called Monoprice.com. According to the website, "MonoPrice.com eliminates high costs for fancy packaging and middlemen. Also, we are able to purchase in large volume." The site really does have great prices and reasonable shipping rates for many different kinds of products, focusing on cables, adapters, and home theater.

Monoprice offers several products that iPod and iPhone users would find useful. Monoprice has some of the best prices I have seen. It's a great place to order individual items and for schools that might order in bulk (they do accept school and government purchase orders).

These items may interest you...

Wall Charger
iPhone/iPod Wall Charger - $3.42 each
This charger plugs into a wall outlet so you don't need to charge from a USB port on a computer. These are great to send home with students to ensure the iPod they are using doesn't run out of juice.
Sync Cable
USB Sync Cable - $1.53 each
Sync and charge an iPod or iPhone with this cable, which is almost identical to the one that came with the device. Classrooms may need extras to send home with students or to construct a syncing station. I like to carry an extra in my bag, just in case I need it.
Battery Pack
Backup Battery Pack - $8.37 each
Attach this spare battery to the bottom of an iPod or iPhone to extend its charge. I like that this battery pack charges using a standard iPod USB sync cable or wall charger (like the two items above) so there's no need to have yet another cable/charger to worry about.
Earbuds with Mic
Earphones with Mic - $3.30 each
These include an in-line microphone, like the earphones that come with iPhones. Besides iPhones, the mic on these earphones works with 4th generation iPod nanos and 2nd generation iPod touches. The mic can be used with apps like Voice Memos and Skype. Don't need the mic and want to save a dollar? Then get earphones without the mic.
Cases
Cases - about $1 each
Protect iPhones and iPods from scratches and drops with a variety of silicone and crystal cases for cheap. Monoprice has a variety of colors, which could be used to color-code a class set of iPods. For added protection, you can pick up protective film for iPhones and iPod touches for $1.27.
USB Hub
USB Hub - about $16.20 each
This USB hub has 7 ports and is self-powered. You can use it to sync and charge multiple iPods at once. Check out how Patrick Ledesma used USB hubs for syncing multiple iPod touches.

Tuesday
Jun302009

NECC Session: iPod touch/iPhone Application Support Group

LeslierFisher.comLeslie Fisher presented a fast-paced session at the National Educational Computing Conference in Washington D.C. It was called The iPod Touch/iPhone Application Support Group. Here are some of the notes I took:

  • Leslie talked about having a battery charge last long by turing off 3G and Bluetooth. Dimming the screen also lets your charge last longer.
  • Take a screenshot by holding down the Sleep and Home buttons at the same time.
  • SaiSuke ($9.99) lets you see your Google Calendar on your iPhone. The best part is that you can see what's written on your calendar in Month view. There is also a free version.
  • Note Pad is a $4.99 replacement to iPod touch's built-in Notes app. Leslie likes that the background is white and it doesn't use Maker Felt as the font.
  • Evernote is free and syncs your notes with your computer and the web.
  • Leslie likes Twitterfon for Twitter.
  • Remember the Milk is for taking notes.
  • Leslie uses Duck You Undo to teach her iPhone new words.
  • Mapping apps works best with GPS on iPhones. Loopt, Around Me, and more.
  • USA Today is a great news app and The Weather Channel is a great weather app.
  • She spent time on not-so-productive apps like Shazam, Beejive ($9.99), iTV,
  • Games: Airport Mania, Jet Set ($4.99), and iSudoku.
  • Responseware from Turning Point is a student feedback collection system.
  • Check out Leslie's 42-slide presentation online. You'll see she mentions music, astronomy, "of the day," and reference apps.

Monday
Jun292009

iTunes Account Without a Credit Card

No Credit CardAn iTunes account is required to download iPhone/iPod touch applications from the App Store. When you create an account, iTunes asks you for a credit card number to keep on file for purchases. When using iPods in schools, teachers probably don't want to use their personal credit card and schools usually do not have a credit card that can be used for iTunes. Fortunately, there is a way to create a new iTunes account without giving financial information. Here's how:

  1. Open iTunes and go to the iTunes Store. Then click to go to the App Store.
  2. Sign out of any iTunes account you might already be signed in with. (Do this by clicking your email address in the top-right corner of the iTunes window. Click the Sign Out button in the dialog box that appears.)
  3. Go to the details page of any free app. Click the Get App button.
  4. Click the Create New Account button and complete the registration.
    Create New Account
  5. When asked to select a credit card, choose None.
    None
  6. iTunes tells you that you will be asked to provide a payment method when you make your first purchase.

I suggest adding money to the new iTunes account through gift cards. This way when you want to purchase a paid app, you still won't be required to give a credit card number.

It's important to note that iTunes will not provide None as a choice for Credit Card unless you create an account by first downloading a free app. The good news is that you only have to do this once, and you can sign into to this account on up to five computers.

Tuesday
Jun162009

Apple IIGS vs. iPhone 3G S

Apple's newest handheld, iPhone 3G S, is for sale this month. I thought it would be interesting to compare iPhone 3G S with one of Apple's desktop computers from 20 years ago, Apple IIGS. The "GS" in IIGS stood for graphics and sound. However, it's clear that today's iPhone is much better with graphics and sound. The "S" in 3G S stands for speed. Compared to IIGS, 3G S certainly is the speedier computer. The similarities of these two computing devices pretty much stop at their names.

Apple IIGS vs. iPhone 3G S

I think the most telling fact above is the number of software applications. The Apple IIGS could run software written for Apple II machines, which were produced for 17 years. iPhone was just opened up to programmers in 2008 and there are there are already 5 times as many apps as compared to what was available for Apple II computers. The number of iPhone/iPod touch apps is set to double by year's end.

The bottom line: you can do a lot more with an iPhone/iPod touch than you could ever do with a IIGS. Sure, it's wonderful that iPhone can access the Internet 50 times faster, has 250 times more RAM and runs at 214 times the megahertz. But really, it's about the usefulness of the computer, and with 50,000+ apps, iPhone is certainly useful.

Apple IIgs photo from flickr.com/photos/quagmirez31/3547583644

Friday
May152009

Tip for Moving Icons on an iPhone or iPod touch Home Screen

If you watched my Ustream.tv workshop last month, you heard about my frustration with organizing my eight pages of apps on my iPod touch's Home screen. Dragging icons from page to page is time consuming and frustrating.

I came across a video on YouTube that gives great advice for my problem: iPhone Tip: Organizing All Those Apps. The video shows how to use the dock at the bottom of the Home screen to move up to four icons at a time. It's quite a clever trick!


Wednesday
Apr292009

Picks from the App Store, April 2009

I hosted "Picks from the App Store" on Ustream.tv on April 29, 2009. The broadcast was recorded live and you are certainly welcome to watch the archive version below or at ustream.tv/recorded/1445088.


The best part about the broadcast was the associated chatroom. Unfortunately, the chatroom was not archived with the video. During the hour-long workshop, I demonstrated and talked about a variety of apps. Here are the App Store links:

In addition, after the show I learned that you can indeed search within the iTunes Store for only free apps. After initiating a search, click Power Search and select Applications. You'll see a checkbox that says Search for free applications.

Note: Unfortunately, the recording did not pick up the audio or video from David's call--another reason to watch live.

Wednesday
Apr292009

Web Directories for Apps

Whether you're browsing in iTunes on your desktop or in the mobile App Store on your iPod touch/iPhone, you can get lost in more than 35,000 apps. But, you should know that iTunes isn't the only place to find apps to download. Let me tell you about three websites that offer alternative ways to sort through all those apps. Although these are websites outside of iTunes, when you find an app to download, they link to the details page in iTunes so you can download the app.

Mobclix

Mobclix keeps detailed data about the App Store. I like that it allows filtering apps by category and price. This way I can narrow my browsing and searching to free apps in the Education category. I can sort the results by rank, average rating, or release date.

App Shopper

AppShopper also makes it easy to browse by category and free vs. paid. You can also browse just new apps. Unfortunately, AppShopper's search option can't be limited to just free apps.

Educational Apps Review

Educational Apps Review has video reviews of a couple dozen apps. The growing number of reviews are tagged by grade level and subject. Simply click on the tags on the left side of the page to see the reviews. The site is run by educators and they are organizing a community around the site with a Ning and a wiki.

You can access these sites on your desktop computer or in mobile Safari. When using mobile Safari, the download links actually launch the mobile App Store where you can download and install the app. (Unfortunately, Educational Apps Review's videos won't play in mobile Safari.)

Last week the billionth app was downloaded from the App Store. Apple recently said they have sold 37 million iPhones and iPod touches. That means that there has been an average of 27 apps downloaded for each device sold. That number will only increase as the App Store gets more and better apps. Next time you want to browse and search for apps, I highly suggest visiting the online app directories above--you just might find your next favorite app!