Entries in ipad (50)

Wednesday
Dec052012

5 Ways to Show Your iPad on a Projector Screen

Teachers really want to the ability to display their iPad or their students' iPads on a projector screen. Projecting on a large screen is great for demonstrations, simulations, explanations, and showing examples. There are several ways this can be done in the classroom. 

If you don't mind keeping your iPad in one spot, then a VGA adapter (for 30-pin Dock connector or for the new Lightning connector) or a document camera (or USB camera) should work for you. 

If you want to wirelessly transmit your device's screen and audio so that you or your students can walk around the room, then it gets more complicated. You'll tap into Apple's AirPlay feature that is built into all iPad 2s and newer, including iPad mini. AirPlay works over Wi-Fi and requires all devices using it to be on the same network.

Apple TV is a small black box that can connect to a projector. iPad can mirror wirelessly to Apple TV using AirPlay. Apple TV only outputs HDMI. Your projector might not have HDMI input. If that's the case, you'll need an HDMI to VGA adapter like the Kanex ATVPRO.

If you already have a computer connected to your projector, you should look into using software to turn that Mac or Windows PC into an AirPlay receiver. You can download and try for free AirServer or Reflector (formerly named Reflection). The software runs on your computer and allows devices to mirror iPad to the computer screen. Since the computer is connected to a projector, then the iPad shows on the projector. I've written lots more about both AirServer and Reflector.

In my visits to various schools, I'd say that Apple TV, AirServer. and Reflector work about 50% of the time. That's because AirPlay requires the device and the computer or Apple TV to be on the same network. Often schools have different networks for mobile devices and for PCs so AirPlay won't work. Also, AirPlay requires specific ports to be open on the network and frequently they are not. It's a good thing there are free trials of AirSever and Reflector so you can test your school's setup before purchasing.

I've whipped up a chart that compares these methods of displaying iPad's screen on a projector. You'll want to click the image to download the easier-to-read PDF version.

Wednesday
Nov282012

The Single Most Important Factor for iPad Success in Schools

When you think of iPads in schools, you probably think of a cart that's wheeled into a classroom. Youngsters cheer at the arrival of the cart. Devices are passed out, used for a lesson, and then returned to the cart. The cart is then whisked away to another classroom where the same thing happens.

Having a cart of devices puts the adults in charge of the technology. If possible, I would like to see students in control. Instead of teachers worrying about syncing, battery level, and app installation, learners should manage all of that. After all, isn't that a crucial skill for living in this century? 

The Technology Enhanced Learning Research Group, lead by Kevin Burden from the University of Hull, investigated the use of iPads at eight different schools in Scotland. The study took place between March and summer 2012 and analysis was completed in October 2012.

The researchers found that "personal 'ownership' of the device is seen as the single most important factor for successful use of this technology." They found ownership is fundamental for increasing students levels of motivation, interest, and engagement. Personal ownership promotes greater student autonomy and self-efficacy. Best of all, ownership encourages students to take more responsibility for their learning.

The study also found that teachers using iPads changed their approach to teaching. Pedagogical shifts include:

  • more collaboration
  • more creative expression
  • a strong learning community
  • better support for students of all abilities
  • students take it upon themselves to teach and coach each other 
  • higher quality of teaching perceived by students
  • teachers give better feedback to students about their learning

Not surprisingly, teachers and students want to continue to have access to iPads and are convinced that their use has changed learning for the better.

Read the key findings or download the full report, which includes recommendations for schools, popular apps, parental and student survey results, school vignettes, and an Acceptable User Policy.

In search of more research about iPads in education? Go to my collection of bookmarks tagged iPad + research on Delicious or Diigo.

Creative Commons licensed photo taken by Lexie Flickinger
schooltechnology.org 

Sunday
Sep302012

Now You Can Upload Photos and Videos to Websites from Your iPad

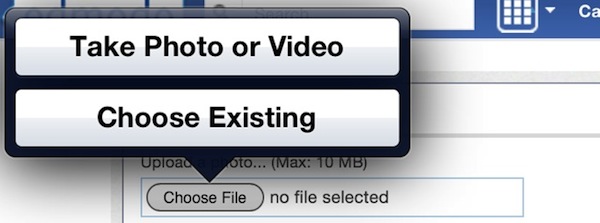
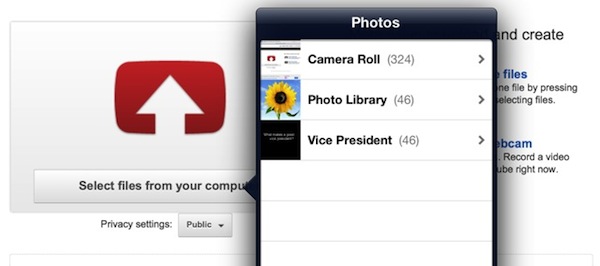
iOS 6 adds a much-needed feature—the ability to use Upload, Select File, or Choose File buttons and links found on websites for submitting files. Previously, when browsing websites that have a button for uploading files, nothing would happen when you tapped it on iPad, iPhone, or iPod touch. Now with iOS 6, tapping that button on webpages brings up your Media Library where you can select an image or video to upload.

Because of this simple addition to the operating system, you can change your profile photo on social networks, upload photos to a blog, insert a photo on a Linoit canvas, and submit videos to websites from iPad, iPhone, or iPod touch without having to install an app.

This is a big deal for schools using iPads. Email has been a primary way for teachers to collect student work (which often might be an image or a video). Email can be challenging to set up in school environments, especially on shared devices. Furthermore, email has file size limits—most notably you cannot email videos longer than 50 seconds using iOS's Email app.

So being able to simply navigate to a website or course management system and upload is handy. I love that there's no need for a separate app, which is the way many sites have dealt with the limitation. For instance, the only reason to use the Edmodo iPad app (aside from it remembering your login) is to upload photos and video. And it has been a multi-step process to add media to an Edmodo post from a device's photo library. With iOS 6, you can simply upload directly to a post on Edmodo by tapping the File link. It's so great that the File link now works, even though it feels like it should have worked like this from the beginning.

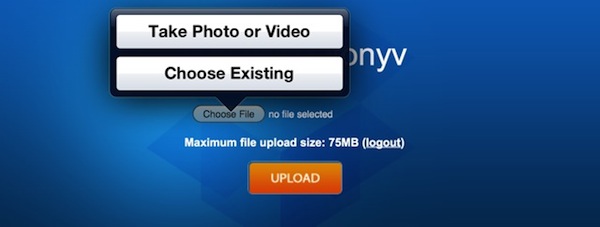
A handy way to collect student work is with Drop It To Me. It's a free service that gives you a URL where others can upload files directly into your Dropbox account. Students do not need a Dropbox account, only the teacher receiving the files needs one. Before signing up for Drop It To Me, you to sign up for a Dropbox accountDrop It To Me works well for collecting videos from Apple devices. Drop It To Me has a file size limit of 75 MB, which should be large enough to accept a video that's six minutes in length. Students can simply go to a teacher's Drop It To Me page, input the page's password, and select a file to upload. The video then shows up in the teacher's Dropbox. However, because you cannot change the name of an image in your Photo Library, photos submitted through Drop It To Me overwrite each other because they have the same file name. 

It sure would be nice to also be able to upload other files types, like PDF, Pages, and Word documents. Apple doesn't give us access to a device's file system, so don't expect this kind of functionally any time soon. We're lucky they let us upload photo and video files...

Wednesday
Sep192012

Limit an iOS Device to Running a Single App

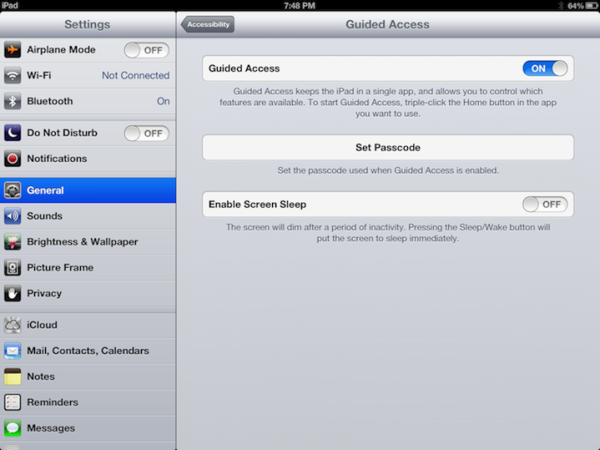
Apple has introduced Guided Access in iOS 6. It keeps your device in a single app and allows you to control which features are available. 

Locking a mobile device into a single app has been a request of parents and educators for some time. Using Guided Access to limit an iPad, iPhone, or iPod touch to one app can be handy when you want a child to remain on task and focused. It is also nice for youngsters who might accidentally click the Home button.

To start Guided Access: 

  1. Launch the Settings App.
  2. Go to General and choose Accessibility.
  3. Turn Guided Access On.
  4. Set a passcode.
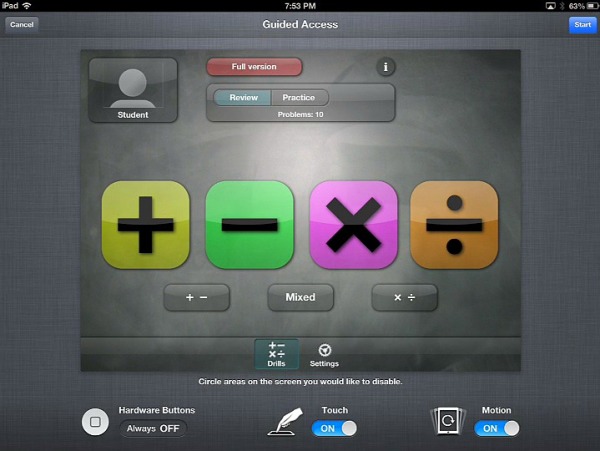
  5. Launch the app you want lock the device into.
  6. Triple-click the Home button.
  7. You can choose to disable touch or motion in addition to disabling the Home and volume buttons.
  8. Tap the Start button. 

To exit the app, triple-click the Home button and enter the Guided Access passcode.

iOS 6 is now available as a free upgrade for iPad 2, iPad 3rd generation, iPod touch 4th generation, and iPhone 3GS and newer.

Monday
Sep102012

Build Positive Behavior with ClassDojo Website or App

When I was a fifth grade teacher I made my own database to track student behavior on my Palm handheld. It was very effective because I could quickly take my device out of my pocket and with a few taps add a record to the database. In fact, my students knew exactly what I was doing if I looked at them and then started tapping on my device. My students knew I kept detailed records on how they behave in our classroom.
 
It was super handy to have all my anecdotal notes in a sortable database. It helped when I conferenced with students and parents because I had specific data collected over time. It certainly helped when completing report cards. And, for whatever reason, digital information is perceived by students and parents as more valid than if I had a paper notebook with my handwritten observations.
 
I used a Palm app (which is now an iOS and an Android app) called HanDBase. Years ago I wrote instructions on how to set up your very own class behavior database. Today, however, instead of buying the app, I suggest looking into ClassDojo.
 
I've been a fan of ClassDojo since I learned about it in the spring. Class Dojo is a free website and a way to track student behavior digitally. 
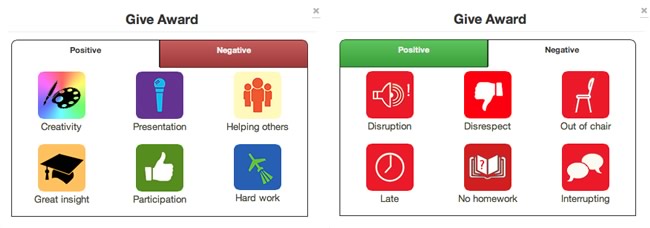
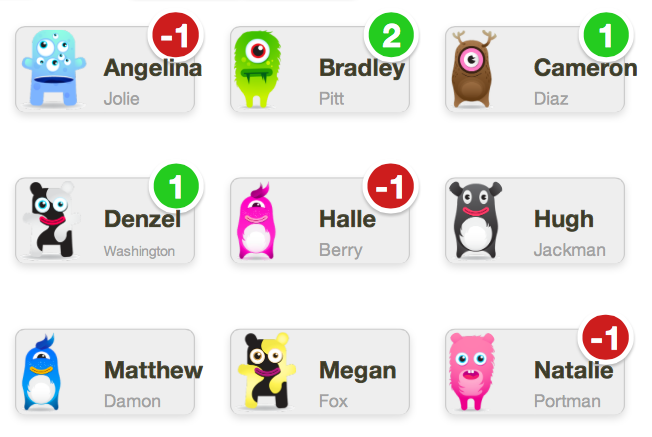
A teacher sets up a class on Class Dojo. Each student can have a cutesy monster avatar. After set up, start the class and can click any name to add a positive or negative behavior. The behaviors are tallied. If you choose to track negative behaviors, it's possible for students to have negative scores. The leader board can be private for just teacher use. However, the list of names and scores can be projected for the class to see. In fact, the leader board works well on an interactive whiteboard.
 
When class or the day is done, ClassDojo will show a report of the class' overall performance. Reflecting on individual and class performance and setting goals for next time can improve classroom climate. Teachers can always access a complete record for every class session for each student. 
 
Class Dojo has been very mobile-minded. The site works well on an iPad and through a mobile browser so teachers can use a smartphone to award behaviors when away from a computer.
 
And now ClassDojo has released an iOS app. The free app allows teachers to set up classes and monitor and track behaviors instantly. The app also has a random student picker.
 
 
So, before creating your own behavior-tracking database, check out ClassDojo and see if it meets you needs. 


Saturday
Jun232012

7th Graders Publish Their Own Textbook

I thought of my fifth grade classroom as a web publishing organization. Whenever it seemed appropriate, we shared our artwork, writing, videos, and other projects on our website, Planet 5th. If I was teaching fifth graders today, we would be crafting our own learning materials, including writing our own textbooks. That's exactly what Andrea Santilli and her seventh graders at Woodlawn Beach Middle School have done. Their eBook, Creatures, Plants and More: A Kids Guide to Northwest Florida, is a top seller in Apple iBookstore. Here's the description of what's in the free eBook's 133 pages:

Creatures, Plants and More is an interactive field guide of Northwest Florida.  The stories and photos are a collection of what students  from Woodlawn Beach Middle School have compiled for everyone to enjoy.  If you are interested in visiting Florida's Best Kept Secret, look no further, the answer lies within the pages of this book!  Enjoy fascinating interactive photo galleries and videos that will AMAZE you!

Andrea and her Advanced Life Science students used iBooks Author to create their highly interactive eBook. All of the photos in the book are ones in which students took themselves. The same goes for the book's videos. The students did a great job. It's not a professionally produced book, but there are lots of things other aspiring iBook authors can learn from these seventh graders. Andrea tells me that currently the book has had over 2,700 downloads from 23 different countries. Those numbers serve as validation of her students' hard work.


Mac Life wrote an article titled Super 7th Graders Publish Their Own eBook to the iBookstore. It explains the project in more detail. "Each student has to choose an organisms they wanted to study and were required to submit their topic for approval. Afterward, students had to write informative – but entertaining! – articles about their organism."

Andrea collected work from 69 students and entered it into iBooks Author. iBooks Author is free but only works on Macs running 10.7 Lion or higher. I'm not sure how Andrea did it, but I would have students layout their pages in their own iBooks Author files, collect their files, and copy and paste the pages into a master book. 

iBooks Author is a fantastically powerful tool. Although it is similar to Pages, Keynote, and Numbers for Mac I find it slightly complicated to use. Luckily, you can find some great iBooks Author tutorials and helpful websites:

There are some disadvantages to using iBooks author for crafting your own learning materials. The biggest issue is that iBooks Author books can only be read on an iPad in the iBooks app. You can't even read the eBook on an iPhone, iPod touch, Mac, or PC. iBooks Author will export your work as a PDF, however, the PDF will lack the interactive table of contents, photo galleries, videos, and other hands-on elements. While I love the format iBooks Author provides, I think that I might still publish a student-made textbook as a website so that it is accessible on all devices and computers. It's just that what you can make with iBooks author is so slick and impressive. Another plus for iBooks Author is that by going through an application process you can have your book listed in the iBookstore.

Check out what Andrea and her students say about writing their book. Fox 10 News filmed a story about the students' publishing efforts that aired May 9, 2012.


I think the comment by CNEBBY in the Customer Reviews of Creatures, Plants and More sums up the project well: "This is an awesome example of what kids can do when they are properly motivated by a skilled teacher."

Friday
Jun222012

iPad Document Camera Stand

Justin Franks contacted me this week with a link to a YouTube video where he proudly shows off his new creation. It's a stand designed to turn your iPad into a document camera. Justin's iPad stand goes by the name Justand.

I was excited to see this because I know a growing number of teachers would like to use iPads as document cameras. And now with AirPlay, iPad can wirelessly mirror its screen to an Apple TV or a Mac/PC running AirServer or Reflection. Though, as those who try to mirror wirelessly know, it's not as reliable as an old fashioned wired connection. Justin's iPad stand can be used with an iPad VGA or HDMI adapter or wirelessly.

Justand's education price is $89 and volume pricing is available. Justin tells me much of the price is for raw materials. The stand is made from large thick sheet of aluminum and has a 40 pound torque hinge. Of course, if you don't already have an iPad, the Justand document camera solution can be over $600. A third generation iPad will make a better document camera than an iPad 2 because the newer iPad has a much better camera.

At $89, Justand is cheaper than most document cameras. However, there are cameras that are less than $89, like IPEVO's $69 Point 2 View USB Camera. Why would you pay more for a stand than what you could pay for a whole camera? If you are already mirroring iPad's screen to a projector, it's one less device to switch to. Instead of switching inputs, you simply adjust Justand's arm and launch a camera app.

Instead of using the standard camera app, I would suggest using the CamDraw app (99¢) to draw on top of the live image from iPad's camera. Now you've got a classroom telestrator! That means you can annotate a science experiment and even draw on your textbook! In addition, you can instantly save screenshots of what's under the camera for use in other apps and for sharing with students.

I love teaching with a document camera. I was the first teacher at my school to ask for my overhead projector to be removed from my classroom because it was a waste of space after I became a document camera user. My fifth graders and I used our doc cam to do many different things:

  • Display a novel or textbook so students can read along
  • Demonstrate experiments so that all can see
  • Instantly exhibit student work, including artwork
  • Demonstrate painting and drawing techniques
  • Model note-taking
  • Complete graphic organizers as a group
  • Go over assignments and tests
  • Show 3D objects
  • Show the construction of graphs
  • Model use of math tools like calculators, rulers, compasses, and protractors
  • Demonstrate the use of editing marks
  • Film Common Craft style videos

I haven't used a Justand and I haven't seen one in person. I thought that someone should, so I asked Justin if we could give away a Justand to a blog reader and he agreed! You can enter to win your very own red aluminum teaching helper.  Just submit your name and your email address in the form below. One submission per person. The winner must have the Justand shipped within the continental United States. Enter by July 6, 2012 and one winner will be randomly drawn. Don't worry, I will not share your email address with anyone. Though, I will forward the winner's information to Justin and he will contact you about shipping your Justand. If you win, it would be nice for you to leave a comment on this post with a mini review. Good luck!

UPDATE: The drawing is closed and the winner has been chosen.

Tuesday
May292012

Show What You Know Using Web & Mobile Apps [Infographic]

Nowadays teachers and students have a variety of ways to show what they know and to express themselves. Take a look at some of the hottest online and mobile tools for showing, explaining, and retelling in my infographic, "Show What You Know Using Web & Mobile Apps." These tools can turn students into teachers and teachers into super-teachers! Furthermore, most of the apps listed in the infographic are free of charge.

You can download the infographic as a high-quality (7 MB) PDF or as a  lower-quality (2 MB) PDF.


Monday
May142012

Let's Use the Hashtag #iosedapp for Tweets with Educational iPad/iPhone/iPod Apps

In March 2010 I proposed that educators use the Twitter hashtag #edapp to make it easy for others to find tweets that mention an educational app when searching Twitter. I even made a t-shirt to get to word out about the hashtag. I wore that shirt and explained hashtags in Episode #22 of the Learning in Hand podcast.

You need to know that no one controls a hashtag. Anyone can use any hashtag, even if what they write is not relevant to the keyword. Unfortunately, spammers are including #edapp in their tweets. That makes it difficult to find the tweets that really contain educational apps. That's a tragedy because I have learned about so many great apps over the last two years through searching for #edapp.

My vision for #edapp was that tweets tagged #edapp would mention a single educational app or list of apps for iPad, iPhone, and/or iPod touch (all of which run Apple's iOS). Because no one controls a hashtag, my vision doesn't mean that it is others' vision for its use. Some Twitter users tag any tweet in which they mention anything that has to do with iPad or iPod touch as #edapp. Some mention web-based tools (even tools that are flash-based and do not work on iOS devices). Android, Windows, and Mac apps are often slipped in there too.

Don't get me wrong. So much of what people have been hashtagging with #edapp has been fantastically valuable. But, I want myself and others to be able to search Twitter and instantly find educational apps for iOS. Between the spammers and the ambiguousness of the keyword edapp, I now propose using the hashtag #iosedapp when mentioning apps or lists of apps for iPad, iPhone, and iPod touch. This is the keyword I will include somewhere in my tweets when I share a newly discovered educational app or when an interesting educational app goes on sale. I hope you'll do the same.

You can find tweets tagged #iosedapp in a variety of ways. One way is to go to twitter.com/search and enter #iosedapp. You don't need a Twitter account to use the search. If you see many tweets that are all the same, refine your search to include -RT. That will remove retweets so all tweets displayed are originals. 

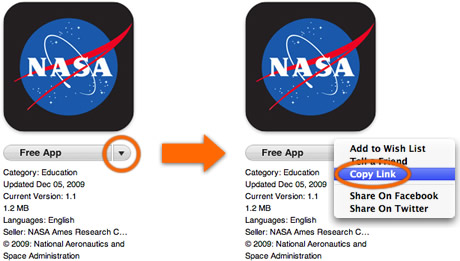
When tweeting about an app, I highly suggest including a link to the app's page in the App Store. The best way to do this is through iTunes on your PC. When on an app's details page, simply click the arrow next to the price and choose Copy Link. Paste that link into your tweet. Don't worry about how long the URL is because Twitter will shorten it.

Check out what has been recently tagged #iosedapp in the widget below. Note that there will probably be some tweets that do not mention an iOS app because, at least at first, some tweets will be referring to the use of the new keyword.  

Got something to tweet about mobile learning and it's not a specific iOS app? Include one or two of these hashtags instead of #iosedapp:

For your information, here's what Twitter has to say about hashtags:

Definition: The # symbol, called a hashtag, is used to mark keywords or topics in a Tweet. It was created organically by Twitter users as a way to categorize messages.

Using hashtags to categorizing Tweets by keyword:

  • People use the hashtag symbol # before relevant keywords or phrases (no spaces) in their Tweet to categorize those Tweets and help them show more easily in Twitter Search.
  • Clicking on a hashtagged word in any message shows you all other Tweets in that category.
  • Hashtags can occur anywhere in the Tweet – at the beginning, middle, or end.
  • Hashtagged words that become very popular are often Trending Topics.

Using Hashtags Correctly:

  • If you Tweet with a hashtag on a public account, anyone who does a search for that hashtag may find your Tweet
  • Don't #spam #with #hashtags. Don't over-tag a single Tweet. (Best practices recommend using no more than 2 hashtags per Tweet.)
  • Use hashtags only on Tweets relevant to the topic.

Of course, I cannot guarantee that #iosedapp won't be overrun with spammers at some point. Maybe in two more years I'll be suggesting yet another hashtag...

Wednesday
May092012

Be an iPad Superstar: 8 Collections of iOS 5 Tips

Just when I think I know a lot of about Apple's iOS, someone shows me a clever feature, setting, or shortcut I've never seen before. Since Apple doesn't include a printed manual, it's up to us as iPad, iPhone, and iPod touch users to find our own ways of learning these tips. I'd like to share eight links with tips to help us get the most of our iOS devices.

The Always Current iOS 5 Tips and Tricks Guide from Mac|Life

50 Really Useful iPad Tips and Tricks from TechRadar

40+ Super Secret iPad Features and Shortcuts from AppStorm

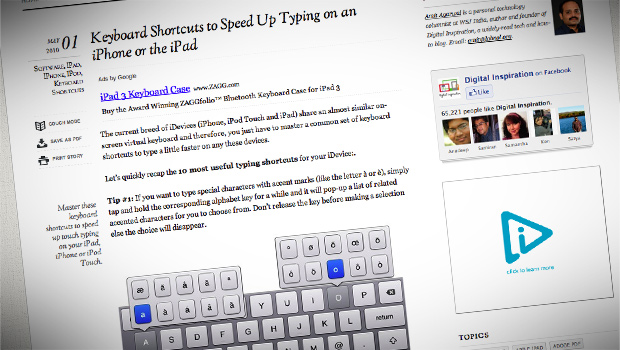
Keyboard Shortcuts to Speed Up Typing on an iPhone or iPad from Digital Inspiration 

 The Complete List of iPad Tips, Tricks, and Tutorials from How-To Geek

 10 Useful Apple iPad Tips and Tricks from Mashable

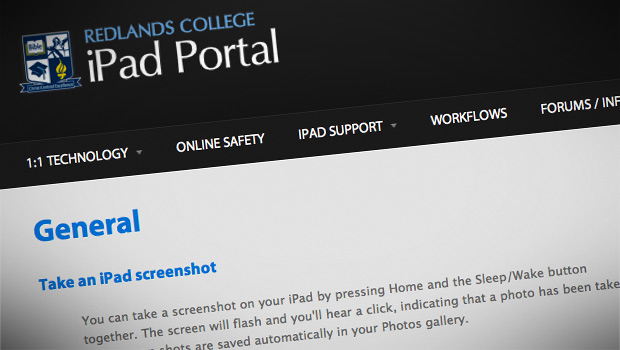
 iPad Tricks and Tips from Redlands College

Fifty iOS 5 Tips in Five Minutes from CNET UK

Follow me on Twitter, @tonyvincent, for more mobile learning tips, including tip-offs when great apps go on sale. 

Monday
Apr302012

iPad Backpack is Also Handsfree Frontpack

iBackFlip Studios sent me their Somersault iPad backpack. Its hallmark feature is its iPad mount. You can flip the backpack around to your front side, unzip the mount's compartment, and you instantly have iPad floating in front of you.  Your hands are free to do whatever you need them to do.

I can imagine situations where this can be great for teachers. They can walk about the room with instant access to an iPad. I'm particularly thinking of teachers who input data for student behavior into their iPads. With iBackFlip, the iPad can be right in front of her for easy access for data recording on the fly. Though, personally, I had success using a pocketable device for classroom data collection since I can simply pull it out of my pants pocket anytime.

There are times students benefit from having an iPad mounted in front of them, especially students who use iPad for assisted communication. Wearing iPad in an iBackFlip Somersault could ensure iPad will not be dropped while making the device readily accessible. The backpack is somewhat sizable, especially for a youngster. The viewing angle can make it difficult to see the bottom of the iPad screen because the Somersault itself gets in the way. Perhaps iBackFlip Studio's Somersault Slim would work better for students because it is not as bulky.

A few more observations:

  • The backpack has plenty of storage.
  • I could almost fit my 13" MacBook Air inside.
  • I need to lock iPad's screen rotation when iBackFlip Somersault is flipped down. Otherwise the screen is upside-down from my perspective.
  • It uses magnets to wake iPad when opened and to sleep iPad when closed. 
  • With some unzipping and folding, you can use iPad's camera without removing it from the mount.
  • The bag is very well constructed and has plenty of padding.

Read the product description, see photos, and view videos at iBackFlip Studios' product page for the Somersault.

Thursday
Mar222012

Learning in Hand #25: QR Codes

Podcast LogoLearning in Hand Podcast Episode #25: QR Codes is all about those two-dimensional bar codes that are popping up everywhere. QR codes have lots of uses for education, especially in classrooms where students are equipped with mobile devices.

The video is fast paced. There are several QR codes you could scan during the video, but because of the pace, you will probably have to rewind and pause in order to scan.

View the 20 minute video on YouTube, on Vimeo, in iTunes, or download to see how QR codes can save time and and make classrooms a little more interactive and efficient.


RSS Feed 


Transcript

This is the Learning in Hand podcast. I'm Tony Vincent and this is the show where I share tips, how-tos, and ideas for using today's digital tools for teaching and learning. Episode 25: QR Codes, recorded March 2012, happens now!

Here's a bar code that get scanned at the grocery store. A bar code like this contains numbers, up to about 20 digits. If you really want to, you can make your own barcodes.

Supermarkets, businesses, and libraries have used bar codes for years because it saves time and is more efficient than typing in the digits.

Here's a QR code. It's like a bar code, but can contain much more information. QR codes contain up to a few hundred characters, and it's not limited to just numbers.

Watch this. I simply launch an app and point my device's camera at the code. Instantly, the QR code is deciphered. The text from the QR code is displayed so fast, no wonder it's called a Quick Response code!

QR codes are not limited to being just text--they can be hyperlinks. When I scan this code, it opens to my website, learninginhand.com. Isn't that great?

You can find QR codes everywhere. They are on signs, coffee cups, business cards, t-shirts, cupcakes, and bananas. You can even get a QR code tattoo if you want. Scanning these codes instantly displays information or takes you to website.

QR codes have been around since 1994.  Why is it that they have recently become so popular

Why the surge in popularity? Well, I'd say it's because now people are carrying around tiny scanners with them all the time--their mobile phones! Most phones, laptops, tablets, and iPod touches now have cameras, and these devices can run apps that transform them into handheld scanners.

You know, it's so easy to make a mistake when typing a web address. It happens to me all the time, especially on a mobile device with a small keyboard. In classrooms with iPads, iPod touches, tablets, or phones, QR codes can save loads of time and headaches.

And what's really great is that there are loads of apps for scanning QR codes that are free. In fact, it won't even cost you any money to make your very own QR codes either.

Currently my favorite QR code scanning app is i-nigma. It's available for iOSAndroid, Windows Phone, and Blackberry. Go to i-nigma.mobi on your device to download it. 

While scanning works best on a mobile device, you can use software on Windows or Mac computers to scan codes. QRreader is free and uses a computer's webcam.  Simply hold up a QR code in front of the camera and it is scanned. QRreader can open URLs automatically in your web browser.

After you have a reader, it's time to get scanning. QR codes can be large or small. They can be printed or you can scan them on a computer screen. You just need to make sure that you are far enough away so the entire code is visible. A code cannot be scanned if it is obstructed. You need to be close enough so that the camera can see the detailing in the QR code.

Making a QR code is easier than you think and it won't cost you anything. Now, you'll most likely create the code on a laptop or desktop so that it can be pasted into a document, printed, or projected. There are apps and software that can do this, but I prefer using online QR code generators. Simply searching for "qr code generator" will give you lots to choose from.

 I like qrcode.kaywa.com because it is very basic. To make a code, first choose URL or text. Type or paste into the box and your code is created. Right-click to save or copy the image. Since the code is just like any other image, you can paste into documents like a PowerPoint slide, a Word document, or SMART Notebook file. Because it's an image, you can print the code out, save it for later, post it at a learning station, or show it your class right from the qr.kaywa.com page itself.

So, what can QR codes do for teaching and learning? Lots, especially in classrooms where each student has a mobile device.

Start Class

Students get their devices and scan a code with directions. Perhaps it's a writing prompt, survey, or web page to read. Scanning a code gets students to turn on their devices and get ready for learning.

Link to Your School or Class Website

Include a QR code that leads to your school or class website on your newsletter letterhead so students, parents, and community can be quickly transported to your website.

Distribute Files

The URL you use for a QR code can lead to a file that's stored online. Check this out. When I scan this code, it opens a PDF in my web browser. On iPad, I can open the PDF in an app like PaperPort Notes where I can annotate it. So QR codes are a great way to distribute files to students. Not just PDFs, but PowerPoint, Keynote, Pages, Excel, and more can be access through a QR code.

One way to distribute a file is to place it in your Dropbox public folder. Copy the Dropbox URL of that file and paste it into a QR code generator. Now students can scan that code and access the file from your Dropbox.

Similarly, TagMyDoc.com is a website where you upload a PDF, Office Document, or image and it will host that file and make a QR code so others can download it. In just a few steps, your file is online and accessibly through the code TagMyDoc.com provides.

Review Books

Walk into some school libraries and you might find a QR code pasted inside the covers of certain books. Scan the code and you are taken to a book review by a student at that school. That means when students are interested in reading a book, they can scan the code to see what their peers think of it. 

Keep in mind that book reviews are going to be longer than the 250 character limit of a QR code. So, the QR code for a book review would be a URL of a webpage, blog, or wiki with the review.

Play Audio

Maybe the book review isn't a written one. Perhaps it's a video or book trailer. Or maybe it's an audio recording of a book review. A QR code can link to any URL, so the URL can certainly be one that belongs to a video or audio file.

RecordMP3.org is an easy way to record and share audio. You simply use your laptop or desktop computer's microphone and record right from the web page. After recording, RecordMP3.org supplies you with a URL you can copy and paste into a QR code generator. When the code is scanned, the recorded audio is played in the web browser. Of course, audio can be used for more than book reviews.

A teacher can record instructions and give extra information using RecordMP3.org and a QR code. Or,RecordMP3.org can be used to record audio study guides, words of the day, interviews, reflections, skits--there are so many possibilities. And because RecordMP3.org supplies a URL, that URL can be made into a QR code.

Speak Text

QRvoice.netis a website that with one click, will turn what you type into audio and gives you a QR code. You've got to see this. I'll type something in and click the button. Instantly a QR code is generated. When scanned, the code takes me to a URL where a computer voice speaks what I typed. 

Point to Apps

If you scan this QR code, it will take iPad, iPhone, and iPod touch users to the App Store details page for the Evernote app. From this screen a user can download Evernote. I use QR codes for apps quite often in my workshops because it's so quick to flash the code on the screen so everyone can download the app without getting lost in App Store.

To make a QR code that goes to the App Store, go to the App's details page in iTunes. Click the arrow next to the app's price or install button and choose Copy Link. Then paste this link into a QR code generator to make your code.

Help & Tutorials

Place QR codes on worksheets that offer extra help. A worksheet of long division problems can have a code students can scan that shows them the steps for solving a problem like the ones on the sheet. Or, the QR code can go to a video detailing how to solve a similar problem. For instance, this code goes to a video by middle school student at Mathtrain.tv that reviews the order of operations. The code could be put on an assignment as a reference.

The iPad app ShowMe Interactive Whiteboard is a great app for teaching concepts through video. Everything you write and say are combined into a video that's uploaded online. After upload, the video has a URL. So, of course that URL can be copied and pasted into a QR code generator. Codes to teacher and student made videos can be a great tutorial, reference, or extension to an assignment.

DoTryThisAtHome.com has some free QR code enabled workshops. The code on this worksheet goes to a video on YouTube about improper fractions. This worksheet's QR code goes to a video about using apostrophes in contractions.

Update or Augment Text Books

Are your textbooks outdated?  Could they use a makeover? Paste QR codes in them! The codes can link to updated information, videos, and interactive websites to supplement and enhance the text.

Go to Google Forms

Google Forms, part of Google Docs, is a great way to collect information. However, the URL Google provides for your form is comically long. No one would ever type this. This URL can be copied and pasted into a QR Code generator. However, since the URL is so long, the QR code will be very dense. Dense codes don't scan as well as simple codes. I suggest using a URL shortener on long URLs before turning them into a QR code.

For example, this is a survey teachers might give parents at curriculum night. I'll copy the link. Then I'll go to bitly.com and paste the link into the box. Then I'll copy the shortened link and paste that into the QR code generator. Yes, it's an extra step, but it really will make scanning your code easier.  Plus, if you are logged into bitly.com when you shorten the URL, it will keep track of how many times that URL was accessed. There are alternatives to bitly.com, including Google's URL Shortener at goo.gl. Many of these shorteners can generate QR codes on their own.

Delivr.com is a QR code generating website that automatically shortens the URLs you input. If you sign into an account, Delivr provides detailed statistics about how many times the code was scanned, when, and where.

Point to a Bingo Card

Want to turn those devices and computers in your classroom into expensive Bingo boards? You can! Scan this code. It takes you to a Bingo board full of weather vocabulary. The squares are randomly positioned each time someone accesses the URL. In a classroom, I could have my students scan the QR code and tap the center Free space to mark it. Then I would say a definition and students would mark the word for that definition. Then I'd say another definition and so on until Bingo is called. It makes for a great review game.

Anyone can make a Bingo board at BingoBaker.com. Simply type in all of your words and click Generate. You could print a set of cards, but even better is using the supplied URL to play online. Copy that URL and paste it into a QR code generator and you've got a QR code to leads to that Bingo board. And it's so cool that each time it's scanned, it generates a different board!

Enhance Field Trips

Teachers are making field trips more meaningful by placing QR codes around the location or on objects. The codes can link to information, give instructions, or even ask students to submit observations through a Google Form.

While on a field trip or at school, it's easy to make a QR code scavenger hunt. Or, you might like to pronounce it, SCANvenger hunt. Classtools.net has a QR Treasure Hunt Generator designed for inputing a series of questions and getting a QR code for each. 

Praise Students

Ok, this next idea is a stretch, but like many QR code uses, it brings some novelty and kinesthetics into the classroom. Instead of writing out feedback on student work, a teacher simply writes a number. That number corresponds to a QR code on a poster in the classroom. The student finds the matching QR code and scans it to receive the feedback. For example, I've got the number 51 written on my paper. So I'll scan QR code #51 on the poster and it tells me "Couldn't have done it better myself."

A teacher in North Carolina is offering her 75 Ways to Say a Good Job QR code enabled poster for free at teacherspayteachers.com.  

Email

QR codes are not limited to text and URLs. They can be used for other kinds of information. For example, if you scan this code it will start an email message from you to me. I created a code that contains my email address, the subject, and the beginning of the message. You can continue editing the message before sending.

I made this code at QRstuff.com. I selected Email Message as the data type and entered an email address, the subject, and body text. This can be handy for collecting student or parent feedback.

Update Twitter

QR codes can be used to post to Twitter. In fact, if you are a Twitter user, scan this code. It opens the Twitter website and fills in the tweet for you. All you have to do it tap Tweet! It's really fast if you are already logged into Twitter in your web browser. Like an email message, you can edit before you send off the message. 

I made the Twitter update QR code at QRstuff.com. I selected Twitter as the data type and chose Twitter Status Update for the Content and typed the text of the tweet.

Explore More Data Types

Check out the other data types that QRStuff.com supports, including Google Maps locations, calendar events, and contact details. Contact details is the one I used to make the QR code on my business card.

Customize QR Codes

QR Codes don't have to be black and white. Codes that are colorful can work just as well. QRstuff.com let you choose a foreground color before you generate a QR code.  

You can get fancier with code creation. Want a colorful QR code with maybe your school or classroom mascot or logo? Go to QRhacker.com. It doesn't have as many data types as QRStuff.com, but it does allow you to change the pixel roundness, foreground and background colors, and even add a logo or image to the middle of the code.

I've found that color coding QR codes can really help me as an educator manage all of the codes. Color can also be an indicator that there's a different QR code on you projector screen. This happens often in my workshops---QR codes I show on the screen all look alike. So I change the color so my audience knows there's a new code in front of them. 

I've shown you just a few of the many inventive ways teachers and students are using QR codes. It seems that every week there's a cool new QR code tool. No matter which tool you use, do test your QR codes before publishing them to make sure they work exactly as you intend. 

QR codes can save time and and make classrooms a little more interactive and efficient. Of course, QR codes are just one tool in a teacher's toolbox. QR codes themselves aren't magic, but how they connect students, teachers, and information can be magical.

That's it for Episode 25. For more about mobile learning, visit learninginahand.com. And please consider recommending me to facilitate a workshops at your school or speak at your favorite conference. Thank you for watching!